May 28, 2026 • Declan Merritt • 9 min reading time • Prices verified June 17, 2026
Monitor Mounts and Magic Arms: Getting Your Field Monitor Where You Need It
If you’ve ever spent twenty minutes on set repositioning a monitor that keeps drifting, sagging, or refusing to land at the angle you actually need, you already understand why this topic matters. A field monitor is an external screen — usually 5 to 7 inches — that you attach to your camera rig or a nearby stand so you (or your client, or your focus puller) can see a larger, better-calibrated image than what your camera’s built-in screen shows. A magic arm is the articulating (multi-jointed, freely positionable) metal arm that holds the monitor in place — tighten one central knob or ball clamp and it locks into whatever angle you’ve set. Getting that combination right is one of those decisions that looks small on a spec sheet and matters enormously on a twelve-hour day. This guide walks you through the mounting systems, load ratings, and attachment standards you need to make the call — whether you’re running a solo mirrorless rig or outfitting a multi-camera commercial build.
| EDITOR'S PICK[SMALLRIG Adjustable Camera Moni](https://www.amazon.com/dp/B08NPJDGRK?tag=greenflower20-20)… | Mid-tier[SmallRig Adjustable Camera Moni](https://www.amazon.com/dp/B08JLZHYVC?tag=greenflower20-20)… | Budget pickSMALLRIG Clamp w/ 1/4" and 3/8"… | |
|---|---|---|---|
| Mount Type | NATO Clamp | ARRI-Style | Clamp (1/4", 3/8") |
| Articulation | — | 360° swivel, 180° tilt | Adjustable friction |
| Anti-Twist | ✓ | ✓ | — |
| Length | — | — | 9.8" |
| Included Arm | — | — | ✓ |
| Price | $35.19 | $31.99 | $19.99 |
| See on Amazon → | See on Amazon → | See on Amazon → |
Why “Any Magic Arm Will Work” Is the Most Expensive Assumption on Your Cart
Here’s the logic trap: magic arms are cheap at the low end (you can find clamp-and-arm combos under $25), your monitor probably weighs under a pound, so load capacity looks like a non-issue. But load rating and holding torque — the arm’s resistance to slowly creeping under sustained weight — are different specs, and most budget arms only publish the former.
Cinema5D’s 2024 magic arm comparison notes that several popular budget arms advertised with 2–3 kg (4.4–6.6 lb) load ratings showed visible position drift within 30–60 minutes of continuous use at even half that load, particularly when the arm was extended horizontally. The physics aren’t complicated: the further your monitor hangs from the pivot point, the more rotational force (torque) acts on the locking mechanism. A 600 g monitor at 30 cm of horizontal extension creates roughly the same joint stress as a 1.2 kg load at 15 cm. This is the same payload-confusion problem you encounter with fluid heads and tripod bowls — the manufacturer’s ceiling number rarely tells you how the arm behaves at sustained working loads.
Where this matters most in practice:
- Run-and-gun with a small crew: If your monitor is on a cold shoe–mounted arm off the top of your camera, the arm is absorbing constant micro-vibration from your movement. Joints loosen faster.
- Client monitor on a C-stand: Here the arm is static but potentially extended further, and the monitor may be larger (7–10 inches, 400–700 g). Creep is a slow disaster — nobody notices until the shot is ruined.
- Cage-mounted monitor on a gimbal: Any compliance (flex or movement) in the arm introduces a parasitic moment that the gimbal’s IMU reads as unwanted tilt. Operators on longer ProVideoCoalition forum threads consistently report that switching to a stiffer arm — even without changing anything else — reduced gimbal tune-time meaningfully.
The Attachment Standards You Need to Know Before You Buy Anything
This is where most practitioners get surprised by ecosystem lock-in. There are four mounting interfaces that matter in 2026, and they don’t all talk to each other cleanly.
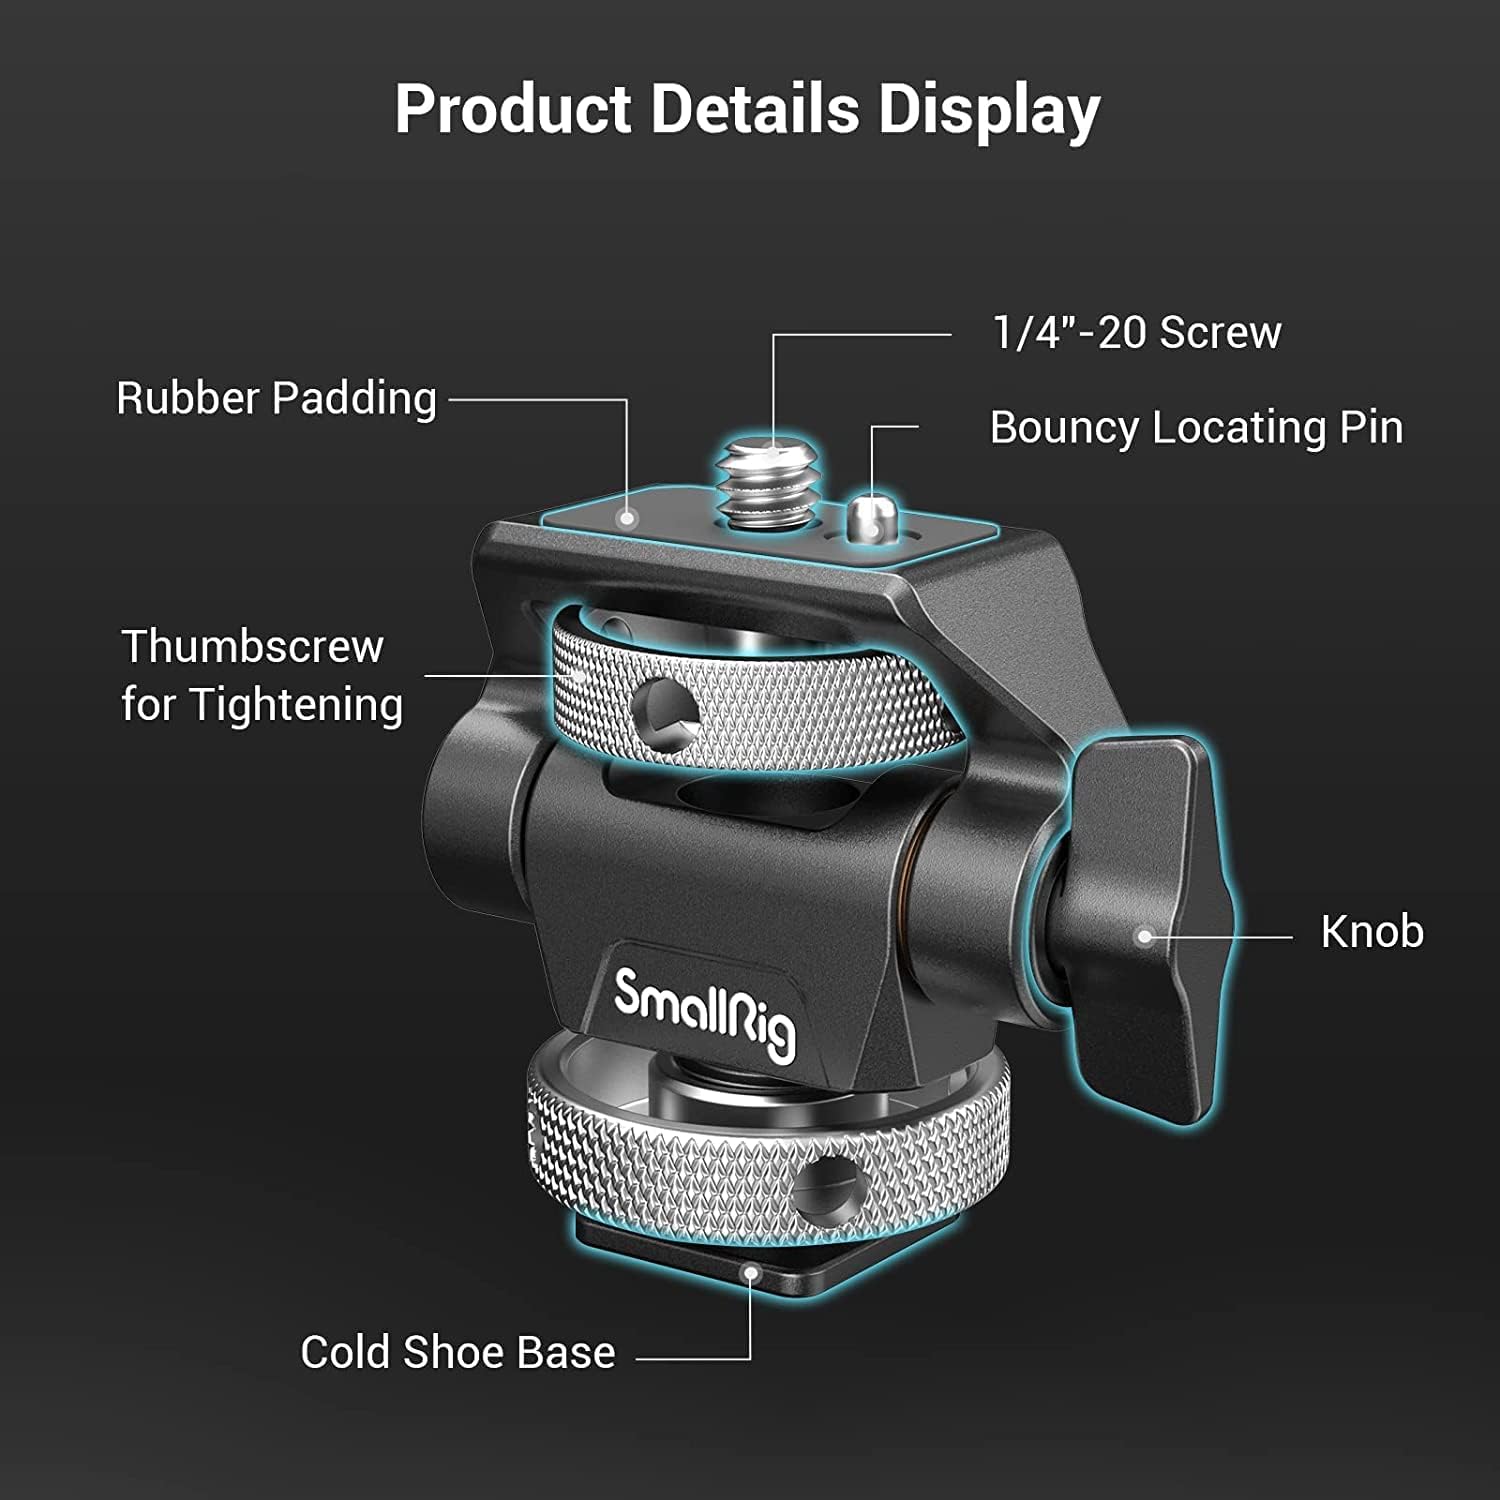
Cold Shoe The rectangular slot originally designed for camera flash units. It’s universal, lightweight, and everywhere — but it’s not a positioning system. Cold shoe mounts can rotate or slip under load unless your arm includes an anti-rotation pin or secondary tightening screw. Fine for lightweight monitors (under 300 g) in static setups. Marginal for anything heavier or dynamic.
NATO Rail / NATO Clamp A 15mm-wide machined rail standard common on camera cages (SmallRig, Tilta, Wooden Camera, and others all run NATO). NATO clamps grab the rail with a sliding dovetail lock — much more secure than cold shoe, and they let you slide the monitor fore and aft to balance weight. PremiumBeat’s on-set monitor guide calls NATO rail “the practical standard for single-operator narrative work” because it centralizes your monitor weight over the rig’s balance point rather than hanging it off a single point. The catch: your cage has to have a NATO rail, and the monitor arm has to have a NATO clamp receiver. SmallRig’s system is the most ecosystem-complete at the mid tier; Tilta’s is better integrated if you’re already in the Tilta cage ecosystem.
ARRI Locating Pin (3/8” with anti-rotation) Two-hole pattern — a 3/8”-16 threaded hole plus a secondary anti-rotation pin hole — that is the de facto standard on cinema-class accessories. ProVideoCoalition’s mounting standards overview explains that the secondary pin eliminates rotational play entirely, which is why ARRI-standard connections are trusted on $10,000+ monitors and used on everything from Bright Tangerine matte box brackets to Vocas shoulder systems. If you’re working with RED or ARRI bodies and cinema-grade monitor options like the Atomos Sumo or SmallHD 703 Bolt, you want ARRI-pin compatibility somewhere in your mounting chain.
Baby Pin / 5/8” Spigot The cylindrical pin standard found on C-stands, light stands, and Manfrotto magic arms. This is your client-monitor-on-a-stand interface. Baby pin attachments are rock-solid for static setups but have zero camera-side relevance unless you’re deliberately building a remote viewing station separate from your rig.
By the Numbers: Magic Arm Tiers at a Glance
| Price Range | Representative Models | Published Load Rating | Practical Notes |
|---|---|---|---|
| $20–$60 | SmallRig 2396, generic clamp arms | 1–2 kg | Adequate for ≤5” monitors in static use; prone to torque creep |
| $60–$150 | Manfrotto 244 Variable Friction Arm, SmallRig 3428 | 2–3 kg | Variable friction models hold position better under sustained load |
| $150–$350 | Kupo KS-1 Mafer + arm, Noga arm systems | 3–5 kg | Cinema-industry preferred; Mafer clamp grips tube or cheese plate securely |
| $350+ | Manfrotto 244N + ARRI pin adapters, Zacuto Z-Rail mount systems | 5 kg+ | Broadcast / cinema spec; rated for large monitors on long extensions |
B&H Photo product listings, May 2026. Load ratings are manufacturer-published figures; real-world holding torque varies with extension length and joint condition.
Matching the Arm to the Monitor — Show the Math First
The most common mistake practitioners with 6–18 months of experience make is buying the arm after they’ve already committed to a monitor size. Here’s the decision sequence that avoids that:
Step 1: Weigh your full monitoring package. Monitor body + sun hood + any HDMI cabling tension pulling on the mount. A 5-inch Atomos Ninja V runs about 185 g without the hood. The Smallhd Focus 7 is closer to 420 g. The Atomos Sumo 19 is 1.28 kg — a different category entirely. Operators reviewing the Sumo on Cinema5D note that even sturdy arms at sub-$150 price points showed progressive joint fatigue over multi-day shoots.
Step 2: Calculate your moment arm. How far will the center of your monitor sit from the mounting clamp? For a camera-top cold shoe mount, that’s often 15–25 cm. For a C-stand client monitor at full horizontal extension, it could be 40–60 cm. Multiply your monitor weight (in kg) by that distance (in meters) to get approximate torque in Newton-meters. A 420 g monitor at 40 cm extension = 0.42 × 0.40 = 0.168 Nm — modest. The same arm at 60 cm = 0.252 Nm — a 50% increase in joint stress from a single C-stand adjustment.
Step 3: Apply a 50% headroom rule. Whatever the manufacturer’s load rating is, buy the arm rated for twice your calculated load at your working extension. Operators across aggregated long-run reviews consistently land on this margin as the threshold where position-holding becomes reliable across a full shoot day rather than the first hour.
Step 4: Match the interface to your use case. Camera-mounted? NATO rail if your cage supports it, cold shoe only if it’s a lightweight setup. Stand-mounted? Baby pin / Mafer clamp. Cinema-adjacent rig? Build toward ARRI pin compatibility now so you’re not adapting your way out of a problem on a rental-grade build.
The Ecosystem Question: NATO Rail vs. Building for Flexibility
No Film School’s field monitor guide points out that the practitioners who regret their monitor mounting choices most often are the ones who bought into a single manufacturer’s “complete system” early, then found themselves renting or adding bodies from outside that ecosystem. SmallRig’s NATO ecosystem is excellent if you stay in SmallRig cages. Tilta’s articulating arm and monitor mounting options are tightly integrated — but Tilta’s NATO implementation has occasionally received criticism in reviews for requiring Tilta-specific clamps to get full fore-aft slide range.
The more durable approach for practitioners building toward commercial and rental-house-grade work: use NATO rail as your camera-side interface and buy arms with a 1/4”-20 / 3/8”-16 dual-thread receiver at the business end. That combination spans nearly every monitor with a standard tripod socket and lets you swap arms without re-configuring your cage. StudioBinder’s breakdown of camera department gear organization notes that AC kits built around dual-thread-receiver arms get re-used across more production types than those built around proprietary clamp systems.
The Kupo Mafer clamp + separate arm approach costs more upfront but is what rental houses consistently spec because the clamp grips almost any rod, rail, or pipe diameter and the arm can be swapped independently when one component wears out. Across rental-house buyer forums tracked by ProVideoCoalition, the Mafer remains the default reference clamp for stand-mounted production monitors at the $150-per-day and above budget tier.
If X, Then Y — Your Decision Rule
You’ve read the tradeoffs. Here’s where this lands:
If your monitor is under 300 g and you’re mounting it to a cage on a mirrorless rig: A quality cold shoe or NATO clamp arm in the $60–$120 range (SmallRig 3428 or equivalent) is the right buy. Don’t over-engineer a static, lightweight setup.
If your monitor is 300–600 g and you’re doing run-and-gun or gimbal work: Move to NATO rail mounting and buy a variable-friction arm with a published load rating of at least 2 kg. Budget $80–$150. The variable friction matters — fixed-joint arms at this weight class need re-tightening too often.
If you’re building a client-monitor or director-monitor station on a C-stand: Buy a Mafer clamp and a separately rated arm for at least 3 kg. This setup will outlast two or three camera body upgrades. Budget $150–$250 for the combination.
If you’re working with cinema-grade monitors (7”+ or 1 kg+) or building toward ARRI/RED productions: The ARRI locating pin standard is your target interface. Build in that direction now rather than adapting later. Budget $250–$400+ for the arm-and-clamp combination, and treat it as a durable production asset rather than a consumable.
Your next step: check your current or planned monitor’s weight with sun hood attached, measure your realistic working extension on your most common setup, and use the 50% headroom rule to set your minimum arm spec before you open a product page. B&H Photo’s magic arm listings (bhphotovideo.com) filter by load rating and clamp type — that’s the fastest way to short-list arms that actually match your numbers rather than the marketing copy.